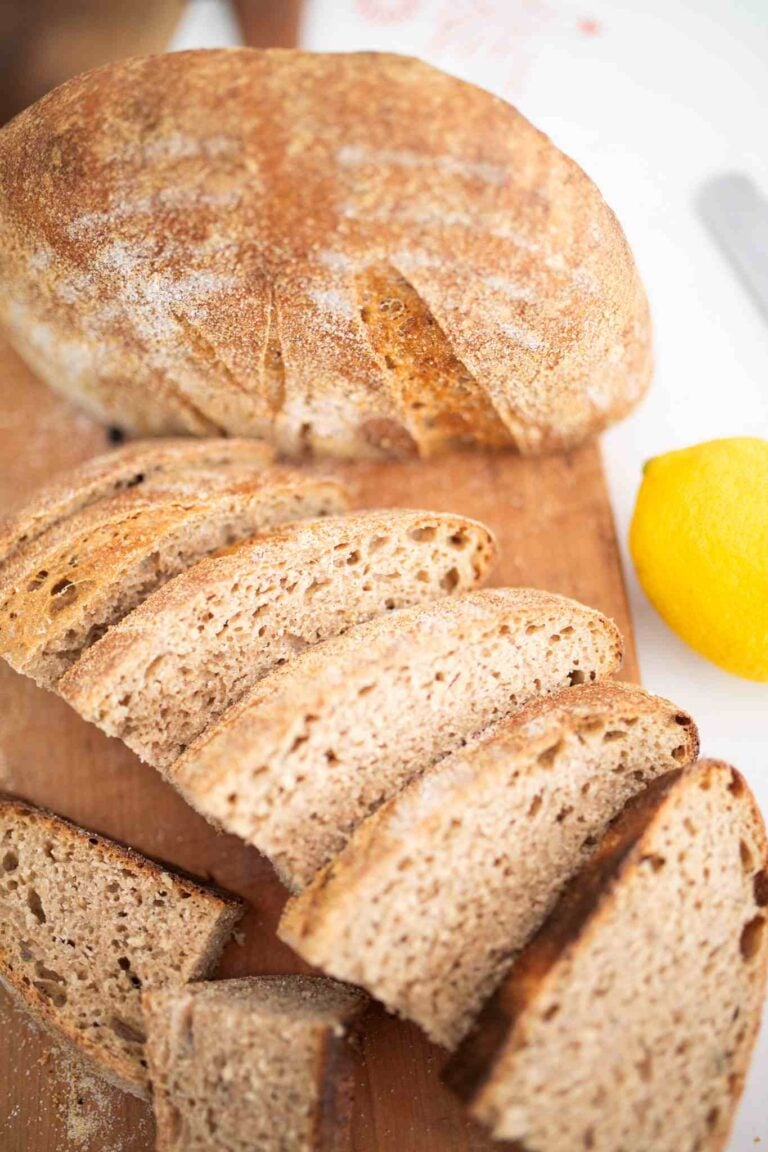
The Perfect Beginner White Sandwich Bread Recipe
The very first loaf of bread I perfected was a basic sandwich loaf. Over the few years of making it, I adapted it to suit me and decided it was time to bring it to the blog. This is the perfect sandwich bread recipe for beginners.
*This post contains affiliate links. I may make a small commission on sales at no cost to you*
I rarely ever make it, however, when I do, we remember how delicious it is! You will never want to buy store-bought bread after making this easy sandwich bread recipe.
For the perfect beginner recipe for sourdough sandwich bread, follow this link: https://therosehomestead.com/sourdough-sandwich-bread/ This is a great recipe for those just starting to make sourdough bread.

If you follow us either here or on YouTube, you know I am pretty obsessed with sourdough and bread baking in general. I love the process of taking a few simple ingredients and making a beautiful loaf of homemade sandwich bread.
When I first started on my bread baking journey, my mom gave me a recipe for a basic sandwich loaf. Over time, I made a change here and there and adapted it to be the perfect loaf for us.
I didn’t have a stand mixer back then. I only had a mixing bowl, my handy wooden spoon, and my hands. There are times I still like to just knead by hand because it’s such a therapeutic process to knead bread dough.

One thing I learned is when you are making a loaf of bread that is this simple, the quality of the ingredients matters so much.
What you will need to make this recipe
Flour
I highly recommend an unbleached all-purpose flour or bread flour. I choose to use Organic flour. But, that is optional. You can also add 1 cup of whole wheat flour for a more flavorful and nutritious loaf.
Salt
I use Redmond’s real salt. But, any sea salt will work great.
Water
It’s important to use filtered water that has been heated to 105-110 degrees F. Cold water is not desired as the yeast will not activate properly. Tap water notoriously has chlorine that can inhibit the growth of the yeast.
Yeast
The only yeast I will use is Red Star Active Dry Yeast. I keep it in either the fridge or the freezer. It has always worked for me and I see no reason to change a good thing, ha ha!
You can also use rapid rise yeast and just add it in to the recipe without proofing.

Step by Step Instructions for making this recipe
Start by heating your water to 105-110 degrees F. Take care to not use hot water, or water warmer that 110 degrees F. Pour the warm water in large bowl and add yeast and honey. Stir. Cover and let the yeast activate. This usually takes between 5-10 minutes.
You can also use a stand mixer if you want for mixing and kneading the dough. Add the water honey, and yeast to the bowl of a stand mixer with a dough hook attachment. Let yeast proof and add the salt, oil, and enough flour to clean the sides of the bowl.
This is the mixer I use: Nutrimill Mixer
Once the yeast is active, add the 3 cups of the flour, salt, and the olive oil.
Mix well with a wood spoon.
**This recipe can also be made in a bread machine. Add the liquid ingredients first and then the flour and then the salt. Choose program for bread**
Take 1/2 cup of flour, still in the measuring cup, and sit aside.
Sprinkle some of the flour on your work surface and turn dough onto the floured surface.
Begin kneading the dough adding just enough flour to keep the dough manageable. How much flour depends on the humidity of your home.
You will not use the entire 1/2 cup, but, have it available just in case.
The goal is to add the least amount of flour as possible so the end result will be a moist loaf.
Knead for 8-10 minutes or until the dough is very stretchy and doesn’t tear easily. This is commonly referred to passing the window pane test.
If using a stand mixer, knead for 10 minutes.
Wash the mixing bowl, dry, and add some oil. Put the dough in the bowl and turn it around a couple of times to make sure it is coated with the oil. Cover with plastic wrap and let the dough rise in a warm place for 1-2 hours or until doubled in size, roughly. This is the first rise.
The rise time will vary depending on the temperature in your home. Once the dough rises to near the top of the mixing bowl and has a domed shaped you can move on to shaping.
Once it has risen, punch down the dough. Grease your loaf pan and sit aside.
Turn the dough onto a lightly floured surface and knead for a couple of turns to make sure you have removed all the air bubbles.
Shape the dough into a loaf shape. I like to lift the dough and drop it on the table a few times to make sure there are no big bubbles inside.

Add to the bread pan, cover, and allow to rise for 30 minutes to an hour or until it tops over the pan. This is the second rise.
Preheat the oven to 350 degrees F. I do this as soon as I add the dough to the loaf pan and let it proof on top of the stove while it preheats. This way, the oven is ready when the dough is.
Bake for 30-35 minutes or until golden brown. If using an internal thermometer, the bread will need to an internal temperature of 205-210 degrees F.
I prefer to brush the top of the dough with an egg wash before adding to the oven. But, this is optional.
Allow the loaf to cool on a cooling rack completely before slicing.
Serving Suggestions
Add melted butter to a slice of fresh bread for one of the best treats!
This delicious sandwich bread is perfect for sandwiches of all kinds.
Storage Tips
Store in a bread bag or airtight container for up to 2-3 days at room temperature.
This loaf also freezes well. Place cooled, sliced loaf in a freezer safe bag and freeze for up to 3 months.
Making your own bread at home is actually very straight forward and is one of the most rewarding things to do for your family!
Unfortunately, this means your yeast has died and you will need to purchase a fresh pack. To avoid this, keep your yeast in the freezer until you need to use it. I have used yeast from the freezer that is over a year old with no issues!
Most likely this is from the shaping. You want to shape the log tightly and I prefer to drop mine on the counter a few times to encourage all air bubbles to come to the surface. Since I started doing this, I haven’t had an issue with the big air bubbles forming in my loaves.

The Perfect Sandwich Loaf
Equipment
- 1 mixing bowl
- 1 wood spoon
- 1 Loaf Pan
Ingredients
- 1 1/2 cups filtered water heated to 105-110 degrees F
- 2 1/4 tsp active dry yeast
- 1 tbsp honey
- 2 tbsp olive oil
- 1 1/2 tsp salt
- 3-3 1/2 cups unbleached all-purpose or bread flour
Instructions
- Add heated water to mixing bowl and add yeast and honey. Stir, cover, and let proof for 5-10 minutes. Yeast mixture will look foamy when activated.
- Add olive oil and salt.
- Add 3 cups flour. Mix well. Reserve other 1/2 cup for kneading.
- Turn onto floured surface and knead for 8-10 minutes. Adding just enough flour to keep dough manageable. You do not need to use the entire 1/2 cup of reserved flour.
- Wash mixing bowl and grease with oil. Add dough and turn it a couple of times to make sure it is coated in the oil. Cover, and allow to rise for 1-2 hours or until doubled.
- Once doubled, punch dough down and turn onto lightly floured surface. Knead for a few turns to make sure it is properly deflated.
- Shape the dough into a loaf shape. Grease loaf pan. I prefer to lift the dough and drop it on the table a few times to make sure there are no big bubbles inside.
- Add the dough to the greased loaf pan. Cover, and allow to rise 30 minutes to an hour.
- Preheat the oven to 350 degrees F.
- Once the dough has topped over the loaf pan, bake in preheated oven for 30-35 minutes or until golden brown. The internal temperature should read 205-210 degrees F.
- Optionally, you can brush with an egg wash before baking.
- Allow to cool completely before slicing.


I enjoyed your old-fashioned way of cooking and making this great looking loaf of bread. I can’t wait to make it myself. Looking forward to following you on your website. Thanks for sharing your gift of cooking.
Thank you so much! Let me know how it turns out!
I’d love to make my own sandwich bread! Thanks for sharing!
You should just go for it! I’m sure you would be amazed how easy it is!
This bread looks fantastic. I love baking bread and hope to try your recipe soon! Thanks for sharing.
Thanks so much!
Five stars for sure. I make this bread several times a month. It is the bread that stopped us from buying commercial bread and we won’t go back. Thanks Mary for always being willing to answer questions and give advice. You are a blessing and a true woman of God.
My family absolutely loves this recipe and make it every week!!
My favorite bread recipe that’s not sourdough. Its how I started my bread making journey. No fail either this one. Now I’m making Sourdough recipes every few days. Thank you Mary.
This is amazing sandwich bread. I got it started this morning for sandwiches for lunch and it was so easy and quick. I felt like I was eating a gourmet sandwich. So much better than store-bought. Thank you for this!
My tried and true recipe includes whole fat milk, which I didn’t have. I decided to give this one a shot and it’s my new go-to! Cheaper ingredients that most always have on hand and just as tasty.
My dad sent me this recipe and I couldn’t be more grateful! I have made this bread twice now and I add just a smidge of vanilla! Thank you for sharing!
Oh, that’s wonderful! Im so glad!
I saw that you live on a homestead? I was wondering if you could give me some insight on where to start if you live in the suburbs? My backyard is reasonable size, and I have canned some things. Just want to have my family be more healthier from what we plant and cook and bake.
The first thing I suggest is cooking from scratch and learning how to make all your meals from home. After that, consider putting in a garden in the back yard and getting a few laying hens for fresh eggs. Easy things to grow are tomatoes, potatoes, onion, peppers, and herbs. As for me and my husband, it all started with 4 laying hens and then kind of evolved after that with gardening, food preservation, and from scratch cooking.
Great, thank you. I always cook from scratch at home as much as possible. Would love to have hens, but just don’t know if our neighborhood allows it. Made your bread this evening and family devoured it, thank you again.
I made this today and it’s absolutely delicious. The loaf turned out beautiful. I’ll be adding this recipe to my book as a go to. Thank you so much for sharing.
What size loaf pan should I use? I have 2 different sizes.
I like the 8.5×4.5 personally.
Hi Mary, I have this recipe rising right now. I have my fingers crossed as my other loaf from a different recipe was a total fail. Surely was something I did as I’m new to this. My oven is a convection oven. Should I adjust the temperature? Thanks
I would check it 5-8 minutes early for internal temperature. You want it to be 195-205 degrees F. It shouldn’t take much off the time, but to be safe just look in on it a few minutes early. I sure hope you like it!
I wish I could leave a photo of the beautiful bread you showed me how to make!
Is the honey necessary? Or is it for flavor? I’m allergic to honey but looking for a simple bread recipe that’s dairy and egg free and not sourdough!
I have made this recipe without the honey and it works great. My dad is diabetic so if I made it for him, I would omit the honey.
Hello! I really was hoping I could make this but I failed. I couldn’t get the bread temp past 197 I was even cooking it 20 min over your suggested time. I let it cool and cut it and it looks doughy a bit. What could I be doing wrong? I’d like to try again
I would suggest getting an oven thermometer and see if your oven is getting up to the correct temperature. If it is off by several degrees, that would make a big difference in the baking time.
This was SO good! Made for the first time today!!!! Absolutely perfect!!! Does anyone know the nutritional break down of this recipe, for example carbs/fat per slice?
I’m in the process of adding nutrition to all my recipes. Here is the breakdown and I have added it to the recipe card. Glad you liked it! Calories: ~118 kcal
Total Fat: ~2.1 g
Saturated Fat: ~0.3 g
Polyunsaturated Fat: ~0.2 g
Monounsaturated Fat: ~1.5 g
Trans Fat: 0 g
Cholesterol: 0 mg
Sodium: ~147 mg
Potassium: ~41 mg
Total Carbohydrates: ~20.8 g
Dietary Fiber: ~0.8 g
Sugars: ~0.6 g
Protein: ~2.9 g
Vitamin A: 0 IU (negligible)
Vitamin C: 0 mg
Calcium: ~4 mg
Iron: ~1.1 mg
First attempt, came out great! Thank you for this recipe! Wish I could post a picture!
First attempt and it’s extremely brittle and crumbly when slicing. Any tips?
Usually a really crumbly loaf is because during the process you added a bit too much flour. It still happens to me sometimes and I find that if I add an egg to the dough while mixing it really helps and can make up for the dryness. I hope that helps!
loved this recipe. first time I’ve made white sandwich bread that didnt turn out like a brick. we’ve made it 3x so far this week for family. have you frozen the dough after the first rise to the use later? I was thinking of having it to have ahead
I haven’t. I usually just bake up the loaf, slice it, and then freeze it because it freezes so well.
Very delicious, but I had to use about 5 cups of flour, not 3, as the dough was still so sloppy with only 3. Followed the recipe exactly up until then, so not sure what went wrong…
I had the same problem with the three cups of flour and still having a very sloppy dough. I did do the spoon method for measuring the flour. I don’t know how much extra flour I added but I know it was over a cup. The dough was raising right now. hoping the loaf turns out okay.
I wanted a sandwich this morning but we were out of bread. I’ve made focaccia and ciabatta before so I said how hard could it be. I found this recipe, dug out all the ingredients and got the yeast bubbling. No idea what kind of flour we had so I just measured out 3 ½ cups. After mixing in the 3 cups I poured it onto my floury countertop. This mess was so sticky I couldn’t knead it. I mashed it around some then put it in the bowl to rise. It rose perfectly. After following the recipe I hade to let it bake an additional 15 minutes to reach the 205 degrees. I have never been so impatient letting the loaf cool. Once I sliced it and took a bite I knew this recipe was “the One.” I made a great loaf of bread knowing I would be throwing the baked mess out. Now I have a starting point it’s time to make more. Thanks for the recipe!
Same here! As gooey and sticky as it was I figured I did something wrong but stayed the course. Deeeeelish!
First time making bread. Looks good. I have it cooling so I haven’t tasted it yet.
I absolutely love this bread but I use more like 4 1/2 cups of flour and the dough is still pretty tacky! It comes out just fine but I have no idea if I’m doing something wrong. 🙈
This is the first successful loaf I’ve done since making my new years resolution 9 months ago. I can’t wait to try it again!!! Thank you!
I made this yesterday and it was so easy & turned out beautifully brown and delicious 😋
My husband says this is a keeper!
This was an epic fail! I followed the recipe, only varying it by using agave syrup in place of honey. It was so sticky that even after adding another 1/2+ cup of flour I couldn’t save it. Going back to my tried and true recipe.
I am terribly sorry it didn’t turn out. I have had consistently great results with this recipe.
First time trying this recipe. I’ve tried others but always seems to fall short of expectations.
First thing I noted was the softness of the dough even after the second rise. Never made such soft dough!
It’s baking it now so the results will be seen very soon.
Well. Results are in. From the wife: “Ya done good, Kid”.
Never made such soft bread. This recipe is a definite keeper. Tastes almost like an Artisan bread but not too “Artisany?”
I followed this recipe to the T – it came out SO sticky – too sticky. I added more flour, then looked up what to do when dough is sticky, says not to add flour. Ugh, very disappointed with this recipe.
I’m so sorry to hear that! I have had such success for many years with this one. I’m happy to troubleshoot with you if you would like to.
Made this bread & absolutely LOVED it!! I see all the comments about the dough being sloppy, mine was sloppy as well but it turned out perfect & SOOO soft. Thank you for sharing I will NEVER. It store bought bread again ❤️
This recipe made the absolute best bread. it will be my go-to from now on. I opted for using half milk and half water and also half bread flour and half AP. For a beginner loaf recipe this seems like a really high hydration, but regardless it produced a very airy and soft loaf. Thanks for a great recipe!