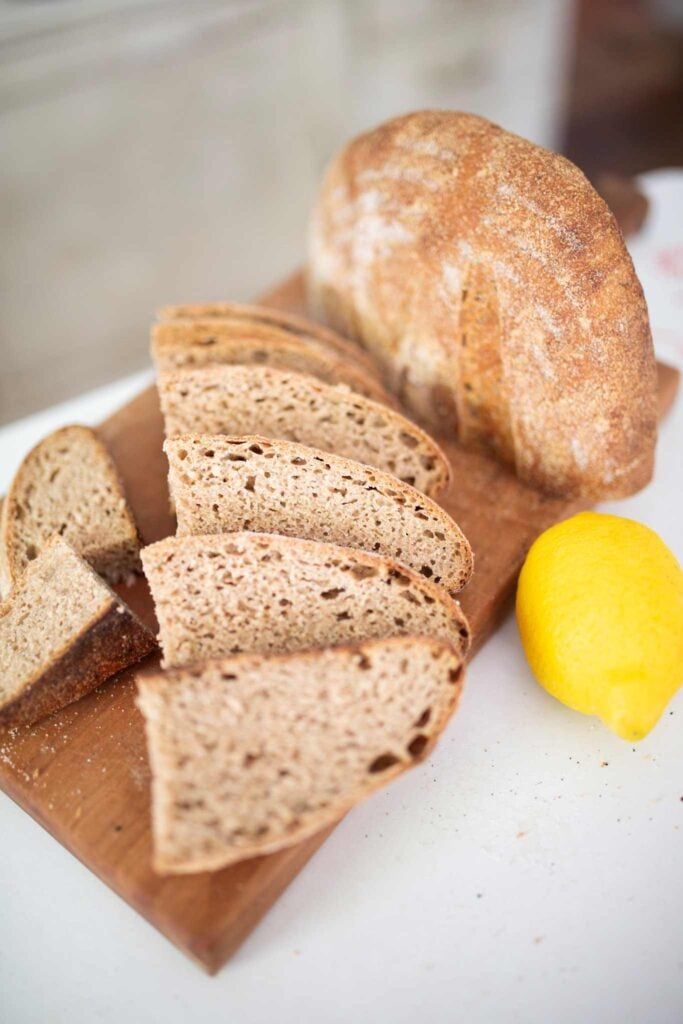
Easy Lemon Rosemary Sourdough Bread {Rustic Loaf}
Fresh and zingy, this lemon rosemary sourdough bread will be a spring and summer loaf you will look forward to year after year!
This post contains affiliate links. I may make a small commission on sales at no extra cost to you
If you’re looking for a fun twist on your sourdough loaves, you definitely want to try this!
Why I love this recipe
This recipe will definitely delight your taste buds and be a family favorite!
Delicious – The flavors of summer bring a freshness to this loaf. The combination of fresh rosemary and lemon make this bread shine!
Beginner Friendly – An easy recipe to make for beginners and seasoned bakers, alike.
Healthy – Made with wholesome ingredients that are easy to find, this loaf is one that you can make all year long if you want!

Ingredients you will need to make Sourdough Lemon Rosemary Bread
- Flour – 500 grams I use fresh milled hard white wheat flour, however you can use all purpose flour, bread flour, or whole wheat flour.
- Sourdough Starter – 50 grams Use active bubbly sourdough starter. That has been fed in the past week if kept in the fridge.
- Water – 400 grams For best results, use filtered water. Tap water typically contains chlorine which is not only an off-putting flavor, but can also inhibit the activity of the starter.
- Salt – 11 grams
- Lemon juice and Zest from one lemon
- Fresh Rosemary – 2 tablespoons (chopped)
Tools you may need to make this lemon rosemary sourdough loaf
Grain Mill – I use the NUTRIMILL GRAIN MILL to mill my hard white wheat berries for this loaf. (Use my coupon: rose20 for $20 off!)
Banneton Basket or Proofing Basket – This is the BASKET I personally use and love.
Baking Vessel – You can either use a DUTCH OVEN or a ROASTING PAN.
Large Mixing Bowl – THIS BOWL is one of my favorite mixing bowls.
Lame – To score the bread, you can use a really sharp knife or razor blade, but a LAME helps you be more precise and is quite inexpensive.
Wheat berries (if milling your own flour) – I have found the best place to get wheat berries is ANCIENT GRAINS. They are always organic and super clean!
Looking for more sourdough bread recipes? CLICK HERE!

Step-by-step instructions for making this recipe
Mill the wheat berries
Using a grain mill, grind your wheat berries on a fine setting. You will mill the 500 grams of wheat berries to make 500 grams of flour.
Mix the dough
In a large bowl, add the water, juice from one lemon, and sourdough starter. Mix well until it is cloudy.
Add in the flour and salt and mix until there are no dry bits of flour left. This dough will be quite shaggy at first.
I like using a dough whisk, but a wooden spoon works well also.
Autolyse
Cover with plastic wrap or a damp tea towel and let the bread dough rest for 30 minutes.
Stretch and Folds
After the dough rests, it’s time to start a series of stretch and folds to build gluten and structure in the dough.
To perform a set of stretch and folds, you will lift up on one corner of the dough and fold it over on itself.
Turn the bowl a quarter turn and repeat.
Continue this action all the way around the bowl for a complete set.
For this particular recipe, you will want to do 4-6 sets that are 15-30 minutes apart.
Add the lemon zest and rosemary
On the last set of stretch and folds, it’s time to add the lemon zest and chopped rosemary.
Before you start the set of stretch and folds, pour in the lemon zest and chopped rosemary.
Continue the set of folds to incorporate the ingredients.

Bulk Fermentation
After the last set of folds, cover the bowl and let the dough rise at room temperature for an additional 3-6 hours depending on the strength of your starter.
The fermentation process may take a bit less time or it may take more. You will know that your dough has properly fermented when it has a domed top and feels airy and pillowy when you press your finger into the dough. The dough should spring back slowly from the indention of your finger.
Shape the dough
Prepare your proofing basket by generously dusting with flour. You can also line the basket with a linen towel or tea towel and dusting with flour.
I prefer using rice flour as it doesn’t absorb the moisture as much as regular flour.
Once the dough has fermented, turn it onto a lightly floured surface.
To shape the dough, you want to basically perform another set of stretch and folds to tighten the ball of dough into an artisan loaf shape.
It doesn’t have to be perfect, but it is important to build tension on the top of the dough for a good oven spring when you bake it.
I find a bench scraper or dough scraper really helps when shaping the dough.
To achieve good surface tension, once you shape the ball of dough, turn it over and drag it against the surface of the table a few times to tighten up the top of the dough.
Now, turn the dough ball over again and put it in the basket SEAM SIDE UP.
Stitch the seams closed as best as you can to keep the tension on the top of the dough.

Second Ferment
Cover the basket and put straight in the fridge for an overnight rise.
Bake the bread
The next morning, preheat the oven to 450 degrees F with the baking vessel in the oven as it preheats.
Once the oven is preheated, take the dough out of the fridge and turn it over onto a piece of parchment paper. Using a sharp knife or lame, make a slash across the top of the dough.
Carefully remove the baking vessel and remove the lid. Lower the dough on the sheet of parchment paper down into the pot and return the lid.
Bake for 20 minutes with the lid on.
Remove the lid and bake an additional 15 minutes until golden brown.
Let the loaf cool completely on a wire rack before slicing.

Storage
Store the loaf in a plastic bread bag or airtight container for 3-4 days on the counter.
Freeze the sliced loaf in a freezer safe bag for up to 3 months.
Yes! You can use any mixture of wheat flours to make this particular recipe. I use all fresh milled flour, but you can use half all purpose and half fresh milled, etc…
If you have a really mature starter, yes you can. However, if your starter is less than a year old, I recommend using active sourdough starter.
Yes, if using dried you will need 2 teaspoons.

Easy Lemon Rosemary Sourdough Bread {Rustic Loaf}
Equipment
- Dutch oven or Roasting pan with lid
- Proofing basket
Ingredients
- 400 grams Filtered water
- 50 grams Active Sourdough starter
- 500 grams Flour
- 11 grams Salt
- Juice and Zest of 1 lemon
- 2 tbsp Chopped fresh Rosemary
Instructions
- In a large bowl, add the water, lemon juice, and sourdough starter. Mix until it is cloudy.
- Add the flour and salt. Mix until no dry bits of flour remain. It will be a shaggy dough.
- Cover and let the dough rest for 30 minutes.
- After the dough has rested, start performing 4-6 sets of stretch and folds.
- To do a set of stretch and folds, lift up on one corner of the dough and fold it back into the center of the dough.
- Turn the bowl a quarter turn and continue this process all the way around the bowl.
- Cover the bowl in between the sets and do these every 15-30 minutes.
- On the last set of folds, add the lemon zest and chopped rosemary and continue with the stretch and folds to incorporate the ingredients.
- Cover the bowl and let the dough rise for an additional 3-6 hours.
- Fermentation time will depend on the strength of your starter. You will know that dough has risen properly when it feels airy and puffy when poked with your finger. The indention should spring back very slowly.
- After the dough has proofed, it's time to shape the dough.
- Prepare your banneton basket by dusting liberally with flour or you can line it with a tea towel or linen towel and dust with flour.
- Turn the dough onto a lightly floured surface and basically perform another set of stretch and folds to shape the dough into either a round loaf shape or oval loaf shape.
- Turn the dough over and drag against the table a few times to build surface tension.
- Place the shaped dough into the basket SEAM SIDE UP.
- Stitch the seams as much as possible to keep the tension on the top of the dough.
- Cover and put in the fridge overnight.
- The next day when ready to bake the bread, preheat the oven to 450 degrees F with your baking vessel in the oven while it preheats.
- Once preheated, remove the dough from the fridge and turn it onto a piece of parchment paper.
- Make a slash in the top of the dough with a sharp knife or razor.
- Carefully remove the baking vessel from the oven, remove the lid, and lower the dough on the parchment paper down into the pot.
- Return the lid and bake for 20 minutes.
- Remove the lid and bake an additional 15 minutes.
- Let the loaf cool completely before slicing.


