Easy Garlic and Herb Sourdough Artisan Bread Recipe
Garlic lovers will fall for this Garlic Herb Sourdough Artisan Bread! With fresh herbs and plenty of garlic, this sourdough loaf will be a real crowd pleaser as a side dish for most any meal!
This post contains affiliate links. I may make a small commission on sales at no extra cost to you

If you love making sourdough bread, I highly recommend trying add-ins for extra flavor.
Using herbs and garlic make this loaf incredibly delicious on it’s own or as a side bread to a pasta dish.
If you are brand new to sourdough and want to make your own sourdough starter, follow my easy method for making a sourdough starter
Why make sourdough bread?
The process of making sourdough bread is quite healthy! Sourdough starter is yeast and rises bread dough.
This fermentation process of rising the dough takes more time than conventional yeast.
In this process your dough is essentially pre-digested making it more easily digestable, especially for those who have minor stomach upset when eating bread.
What is Active Sourdough Starter?
Active starter is starter that has been fed within the last 24 hours. It should have lots of bubbles and a pleasant smell.
This stage of a starter is best for recipes that require a big rise like loaves of bread.
What is Sourdough Discard?
Sourdough starter discard is starter that is hungry. It hasn’t been fed recently and will have a liquid on top with an acetone odor.
This stage of starter is best for recipes that don’t require a rise.

Why I love this recipe
This recipe takes simple ingredients that elevate the flavor of the sourdough artisan bread to a whole new level.
A basic sourdough loaf recipe that consistently turns out great no matter what add-ins you decide to use.
Shop this post
I use all freshly milled flour in my baking. To mill my flour, I use the Nutrimill Impact Grain Mill
When your bread is on the second rise, a banneton basket helps hold the shape of the dough.
To score the bread, I like to use a bread lame
To weigh my ingredients, use a kitchen scale
Having a baking vessel that can hold in the steam is important. I use a Dutch Oven

Ingredients you will need for this Garlic and Herb Sourdough Bread
- Flour – I used freshly milled hard white wheat. You can use all purpose flour, bread flour, or whole wheat flour.
- Water – For best results, use filtered water.
- Sourdough Starter – Use mature starter or active starter.
- Salt
- Garlic – Although you could use garlic powder, chopped fresh garlic is best for this recipe.
- Herbs – Use any combination of either fresh herbs or dry herbs.
For complete ingredient amounts, see recipe card below

How to make Garlic Herb Sourdough Artisan Bread
Mix the dough
In a large bowl, add the water and the starter.
This recipe is in weighted measurements for the water, flour, and starter. I weigh each ingredient and zero it out in between.
Mix the starter and water until cloudy and add the flour.
With a wooden spoon or dough whisk, mix slightly and then add the salt.
Continue to mix until a shaggy dough forms.
Autolyse
Cover the bowl with plastic wrap and let the dough rest for 1 hour at room temperature.
In the meantime, chop your herbs and garlic.
After an hour, it’s time to start stretching and folding the dough.

Stretch and Fold plus add the add-ins
On the first stretch and fold, take the bread dough out of the ball and place on your work surface.
Spread the dough out into a rectangle and pour the herbs and garlic on top of the dough.
Starting at a corner of the dough, pull up and over into the center all the way around the dough.
Lightly knead the dough until you can see the herbs on the surface of the dough.
Place back in the bowl and let rest for 30 minutes.
To perform each stretch and fold, pull up on a corner of the dough and lay it over the center of the dough.
Do this all the way around the bowl by turning it a quarter turn in between each stretch and fold over of the dough.
Cover and let rest 30 minutes.
I prefer to do 4-6 sets of stretch and folds with my artisan bread

Bulk Fermentation
Once you have performed 4-6 stretch and folds, cover the dough and let the dough rise for 4-8 hours.
After the dough has risen for 4-8 hours depending on the strength of your starter, prepare a banneton basket.
Second Rise
To prepare the basket, line with a linen or cotton tea towel and generously flour.
Rice flour works remarkably well for this application.
Turn your dough onto your work surface smooth side or top side down.
Do a final stretch and fold to shape the dough.
Turn the dough over with the smooth side up and drag the dough ball on the table to build tension.
I prefer to do this several times to make sure the top of the dough is very tight.
Place the dough top side down into the banneton basket.
Stitch up the seam side to keep the tension on the top of the dough.
Cover with plastic wrap and place in the fridge for at least 6-8 hours or up to a few days.

Bake the Bread
The next morning, preheat a Dutch oven in the oven to 450 degrees F.
Once it is preheated, take the dough out of the fridge and turn it onto a piece of parchment paper.
Make a slash in the top of the dough with a sharp knife or razor blade.
Carefully remove the Dutch oven from the oven and remove the lid.
Move the loaf of bread to the Dutch oven and replace the lid.
Bake for 20 minutes covered.
Remove the lid and continue to bake for 15 minutes.
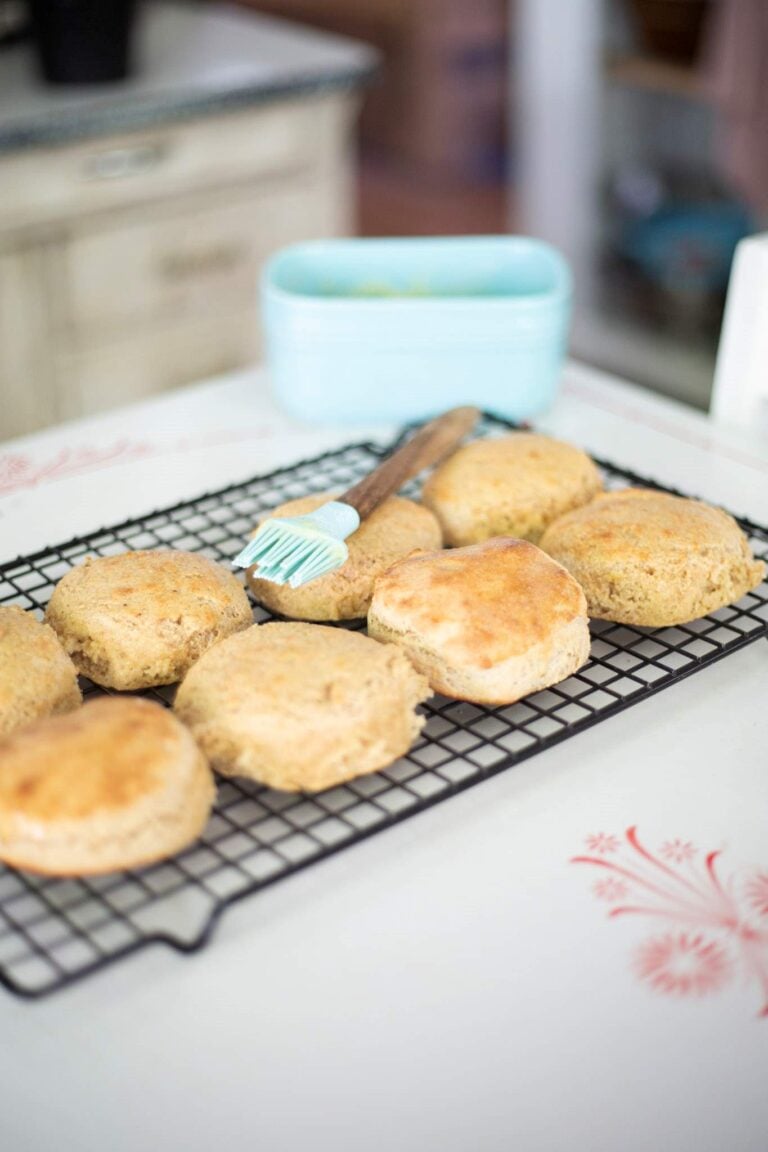
Allow the bread to cool on a wire rack completely before slicing.
You can brush the top with butter for even more flavor.
Drizzle olive oil on a piece of bread for an incredibly delicious treat!

Storage
Store in an airtight container or plastic bag on the counter for 3-4 days.
Freeze in freezer bag for up to 3 months.

Garlich and Herb Sourdough Artisan Bread
Equipment
- 1 Dutch Oven
- 1 Banneton Basket
Ingredients
- 325 grams water
- 100 grams sourdough starter active/mature
- 500 grams flour
- 2 tsp salt
- 6 cloves fresh garlic
- 2 tbsp fresh herbs or 2 tsp dried herbs
Instructions
- In a large bowl, add the water and sourdough starter. Mix until cloudy.
- Add the flour and mix slightly. Add the salt.
- Mix until a shaggy dough forms. Cover with plastic wrap and let rest for 1 hour.
- In the meantime, chop your herbs and garlic.
- After an hour, it's time to start stretching and folding the dough.
- On the first stretch and fold, take the bread dough out of the ball and place on your work surface.
- Spread the dough out into a rectangle and pour the herbs and garlic on top of the dough.
- Starting at a corner of the dough, pull up and over into the center all the way around the dough.
- Lightly knead the dough until you can see the herbs on the surface of the dough.
- Place back in the bowl and let rest for 30 minutes.
- To perform each stretch and fold, pull up on a corner of the dough and lay it over the center of the dough.
- Do this all the way around the bowl by turning it a quarter turn in between each stretch and fold over of the dough.
- Cover and let rest 30 minutes. I prefer to do 4-6 sets of stretch and folds with my artisan bread.
- Once you have performed 4-6 stretch and folds, cover the dough and let the dough rise for 4-8 hours.
- After the dough has risen for 4-8 hours depending on the strength of your starter, prepare a banneton basket.
- To prepare the basket, line with a linen or cotton tea towel and generously flour. Rice flour works remarkably well for this application.
- Turn your dough onto your work surface smooth side or top side down.
- Do a final stretch and fold to shape the dough.
- Turn the dough over with the smooth side up and drag the dough ball on the table to build tension.
- I prefer to do this several times to make sure the top of the dough is very tight.
- Place the dough top side down into the banneton basket.
- Stitch up the seam side to keep the tension on the top of the dough.
- Cover with plastic wrap and place in the fridge for at least 6-8 hours or up to a few days.
- The next morning, preheat a Dutch oven in the oven to 450 degrees F.
- Once it is preheated, take the dough out of the fridge and turn it onto a piece of parchment paper.
- Make a slash in the top of the dough with a sharp knife or razor blade.
- Carefully remove the Dutch oven from the oven and remove the lid.
- Move the loaf of bread to the Dutch oven and replace the lid.
- Bake for 20 minutes covered.
- Remove the lid and continue to bake for 15 minutes.
- Allow the bread to cool on a wire rack completely before slicing.


Do you use fresh milled flour with this recipe? Thank you!
Yes, I used fresh milled hard white wheat.
Love this loaf. Making a second one right after the first. Love this channel
Does incorporating the fresh garlic and herbs during stretch and folds affects bulk fermentation? I made 3 batch of dough, separated 1/3 to do this inclusion and it is not raising, yet the dough I didn’t do the inclusion rose and I shaped and ready for fridge.
I didn’t run in to any problems with the rise after adding the inclusions. Im a bit perplexed by this one!
Raw garlic absolutely affects the rising of sourdough. The raw garlic has significant antibacterial properties and inhibits the sourdough culture activity. I had this issue with this recipe too. It’s better to roast your garlic in a pan first which solved this problem.
First time I have weighed the ingredients and used the ice cube method. It worked! I used crushed garlic and fresh basil from my garden. We will definitely be enjoying this again!
I have t different shape batam basket the round or loaf..am thinking the loaf one would be better..also dried herbs?
Patricia