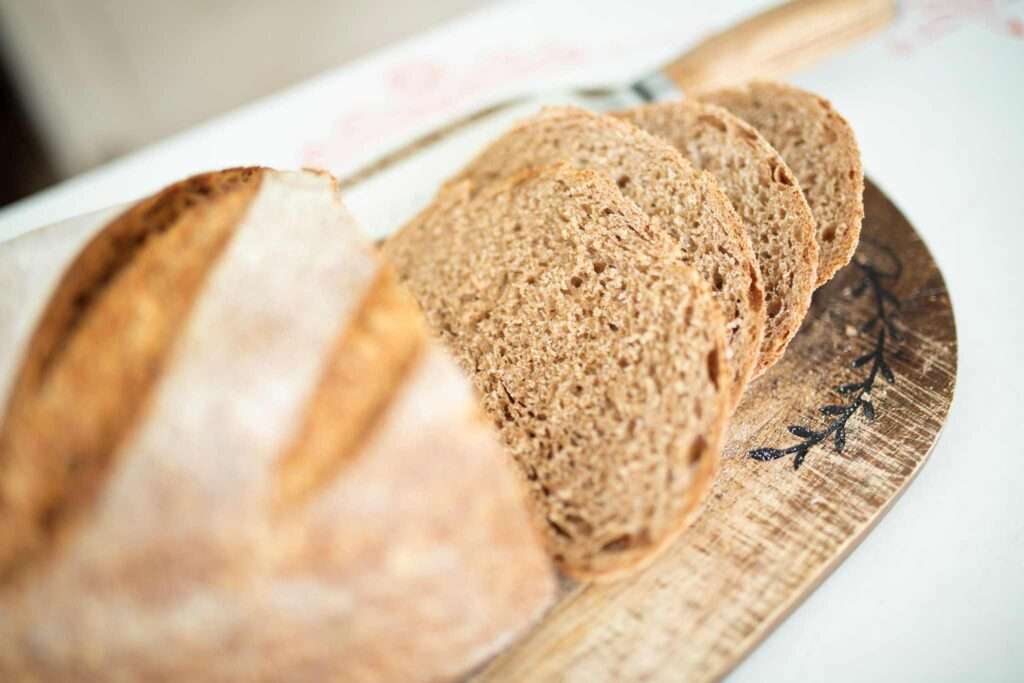
Spelt Sourdough Artisan Bread with Fresh Milled Flour
This Spelt artisan sourdough bread is made with 100% fresh milled spelt flour for incredible flavor and nutrition!
If you mill your own wheat and are interested in using ancient grains, this recipe is for you!

This post contains affiliate links. I may make a small commission on sales at no extra cost to you
Spelt is an ancient grain that has a wonderfully nutty flavor and high nutritional value. It has a weaker gluten structure (less gluten) than modern wheat varieties like bread flour or all purpose flour (white flour).
Whole grain spelt flour has the most nutrition and flavor making this loaf incredibly flavorful and healthy!
Why I love this recipe
Delicious – With its deep nutty flavor paired with the tang of the sourdough starter, this is one loaf that you will love!
Easy – This is an easy recipe with just a few basic ingredients and is mostly hands off.
Healthy – Quite possibly one of the healthiest bread recipes, this whole grain spelt sourdough bread recipe checks all of the boxes!
Looking for a sourdough sandwich bread using spelt flour? Try this one!
Shop this post
To mill my own whole grain flour, I use a Nutrimill Grain Mill
A banneton basket or proofing basket helps the loaf keep its shape during the final proof. This is the Banneton Basket I use.
To score the top of the dough, a Lame comes in very handy!
Ingredients to make this Spelt Sourdough Artisan Bread
- Whole Grain Spelt Flour – I use fresh milled flour from whole spelt berries.
- Sourdough Starter – Use active sourdough starter that is bubbly.
- Water – For best results, use filtered water.
- Salt
For full ingredient amounts, see recipe card below.
How to make this Spelt Sourdough Artisan Bread
First, mill 500 grams of spelt berries on the fine setting of your grain mill.
Mix the dough
In a large bowl, add the water and sourdough starter. Mix well until milky.
If your kitchen is very cool, you can start with lukewarm water to give the starter a head start at fermentation.
Add the fresh milled flour and salt to the water and mix until combined and there are no dry bits of flour remaining.
The dough will be shaggy and tacky to touch.
Autolyse
Cover the bowl with plastic wrap or a damp tea towel and let the dough rest for 30 minutes to an hour.
This process of soaking the flour allows it to fully absorb the water.

Stretch and Folds
After the autolyse, it’s time to start a series of stretch and folds.
First, take a corner of the dough and lift it up and then fold it over onto the center of the dough ball.
If the dough is too sticky, grab a small bowl of water and add a little bit to your fingers to prevent sticking.
Continue this process all the way around the bowl.
Aim to do 5-6 sets of these every 15-30 minutes.
You will notice you are able to lift the dough higher each time you come back to the dough.
Bulk Fermentation
Once you complete all of the stretch and folds, cover the bowl and continue the bulk fermentation time or first rise.
This time will vary depending on how strong your starter is, but generally it will need to rise for an additional 3-6 hours.
Signs that your dough has fermented properly is a domed dough with visible bubbles on top that feels like it is full of air.

Shape the dough
Turn the dough onto a lightly floured work surface.
Gently lift the corners of the dough and fold them over the center much like a set of stretch and folds all the way around.
Turn the dough over and drag the dough on the work surface to build surface tension which helps with oven spring.
Drag the dough like this 3-4 times.
Prepare the banneton basket
Generously flour your banneton basket with flour. I prefer to use rice flour as it really helps prevent sticking. But, regular flour will work fine.
Don’t worry about over flouring as you can always brush the excess off.
Place the dough into the basket seam side up.
Pinch the seams closed.
Cold Fermentation/Final Rise
Cover the basket with plastic wrap and place in the fridge overnight.

Bake the bread
The next morning or the next day, preheat the oven to 450 degrees F with a dutch oven or an oval roasting pan with a lid in the oven as it heats.
Once preheated, take the dough out of the fridge.
Turn the dough onto a piece of parchment paper and take a razor blade or sharp knife and make a slash across the top of the dough.
Carefully remove the baking vessel from the hot oven and remove the lid.
Lower the dough on the parchment paper into the the vessel and replace the lid.
Bake for 20 minutes with the lid on.
Remove the lid and bake an additional 15 minutes or until deeply golden brown.
The internal temperature should be 195-205 degrees F.
Let the dough cool completely on a wire rack before slicing.

Storage
Store cooled bread in a plastic bag on the counter at room temperature for 3-4 days.
This bread freezes very well in freezer safe bags for up to 3 months.
Yes, you can definitely use all purpose spelt flour for this bread recipe.
A couple of things I would investigate is: 1. How old is your starter and has it been rising bread dough before this recipe? 2. How warm is your kitchen? Check these first and it may be that you will need to let your dough rise longer on the counter, possibly overnight and then shape the dough the next morning.

Spelt Sourdough Artisan Bread with Fresh Milled Flour
Ingredients
- 500 grams Whole Grain Spelt Flour
- 400 grams Filtered Water
- 100 grams Sourdough Starter
- 11 grams Salt
Instructions
- First, mill your wheat berries on a fine setting of your grain mill.
- In a large bowl, add the water and the sourdough starter.
- Mix well until the mixture appears milky.
- Add the fresh milled flour and salt.
- Mix until there are no dry bits of flour remaining.
- Cover with plastic wrap or a damp tea towel and let rest for 30 minutes to an hour.
- After resting, start a series of stretch and folds.
- Lift up on one corner of the dough and fold it over the center of the dough.
- Turn the bowl a quarter turn and continue all the way around the bowl. Cover and let rest 15-30 minutes.
- Aim to do 5-6 sets of stretch and folds.
- Each time, the dough will lift up higher as it builds gluten.
- After the last set of stretch and folds, cover and let the dough continue to ferment on the counter for an additional 3-6 hours depending on the strength of your starter.
- Next, turn the dough onto a lightly floured work surface.
- Much like a set of stretch and folds, lift up the corners of the dough and fold them on the center of the dough all the way around.
- Turn the dough over and drag it against the counter top to build surface tension. Drag the dough like this 3-4 times.
- Generously flour a banneton basket with either rice flour or regular flour.
- Place the dough in the basket SEAM SIDE UP.
- Pinch the seams closed.
- Cover the basket with plastic wrap and place in the fridge until the next morning.
- The next day when you are ready to bake the bread, place a dutch oven or oval roasting pan with a lid in the oven and preheat to 450 degrees F.
- Once preheated, remove the dough from the fridge and turn it over onto a piece of parchment paper.
- Using a razor blade or sharp knife, slash the top of the dough.
- Carefully remove the hot baking vessel from the oven and remove the lid.
- Lower the dough on the parchment paper into the vessel and replace the lid.
- Return to the oven and let bake 20 minutes with the lid on.
- Remove the lid.
- Bake an additional 15 minutes with the lid off until deeply golden brown.
- The internal temperature should be 195-205 degrees F.
- Place the bread on a cooling rack to cool completely before slicing.


This spelt sourdough recipe is delicious! Thank you for the great instructions!
Hi Mary. My husband and I prefer a mild sourdough versus a well developed tanginess. That’s why I love your spelt sandwich bread recipe so much. Can I make this one all in one day, letting it do its second rise in a warm place? Would I need to adjust my oven temperature or time at all for that?
Sure, I am making a same day version today, actually! No adjustments with the baking time or temp. And, yes just do the second rise on the counter for 1-2 hours before baking. So glad you like the recipe!
♥️ thank you for your quick reply!
Mary, could I use the Bosch mixer for this (based my question on a podcast you were on where you talked about using the kneading attachment) could I also use a stiff starter?
Yes, you can definitely use a stiff starter and you can mix the dough in the mixer. You could also knead it and just let it rise or you can just mix it in the mixer and do the stretch and folds.
this spelt sourdough loaf was delicious and came out faaaaar better than any other recipe I’ve tried thus far! it was an absolute hit. I did up all the ingredients by 5% to fill my dutch oven a little better and also incorporated the tangzhong method because I wasn’t having success with my loaves and figured I had nothing left to lose 😄 nonetheless it was great and I look forward to making it again 🥰
How did you incorporate the tangzhong method?
Thanks for the reply to my question, Mary!
Made this today and it’s wonderful! Love the nutty taste and my loaf even has holes!
I kneaded the dough in my Bosch Universal mixer. Any tips for getting the dough out of the bowl? It was a mess but I was able to scrape the dough out.
Thankyou again, Mary!
Should the dough rise to 50% in the bulk ferment stage or less?
I would say I let it rise to at least 50% in the bulk fermentation.
Would this be a good recipe to double? My family is really enjoying this bread, and I’m baking a new loaf about every 3 days!
Sure, it can definitely be doubled.